Sweet and Simple Magazine: candy

email pop up

Showing posts with label candy. Show all posts

Coconut Jelly Bean Cake Recipe * Easter


When I was growing up my mom made us a special treat each year. It was always one of my favorites. It was her White Chocolate Coconut Jelly Bean Candy Easter Nests. I just love how the white chocolate, coconut and the fruity flavors of the jelly beans mixed so well. With this flavor combination in mind I came up with a new Easter tradition our Easter Cake. As I thought about the flavor of the jelly beans Kool-Aid came to me. Kool-Aid comes in many different shades of bright colors, it has similar flavors and some of our favorite jelly beans so it was the perfect solution to both coloring and flavoring each layer of our Easter Cake.


Our Easter Cake has a pink strawberry, yellow pineapple, green lemon lime and blue mixed berry layers. It is frosted with the most delicious coconut white chocolate buttercream frosting. Combining the coconut and the flavors remind me of a colada drink.
This is a great cheery cake for kids.

Cake:

  • 2 Box Cake Mixes or 2 batches of White Cake Batter
  • 1 packet of Kool-Aid drink mix powder for each color -4 total (the ones without sugar)


Prepare you favorite box white cake mixes or this great from scratch recipe for White Cake ( two batches.)

Divide the cake batter equally into to 4 medium mixing bowls. Slowly add Kool-Aid powder until you reach the desired color and flavor or each color.

Preheat oven at 350 degrees.

Bake each cake color layer in a 8 or 9 inch round cake pan for about 18-20 minutes check after 18 minutes. Cake will bounce back when done when pressed down in the middle with your finger.

Cool for 5 minutes then remove from pan and completely cool on cooling rack.

Wrap each cake layer in plastic wrap and place in freezer.


White Chocolate Coconut Buttercream Frosting:
Note: You will need two batches for this cake

  • 2 pound bag of powdered sugar
  • 1/2 milk
  • 1 cup softened butter
  • 1 teaspoon real vanilla extract
  • 1 cup of sweetened shredded coconut
  • 1 cup of melted white baking chocolate
In a stand mixer using the whip attachment whip together melted white chocolate, butter, milk, vanilla and about 1/2 cup of the powdered sugar to incorporate air. This will make your frosting nice and light and fluffy. 
Slowly mix in the remaining powdered sugar then add coconut and whip together. 
This frosting is creamy, delicious and sets up very nicely.

Coconut Nest Topping:
  • 1 cup of sweetened shredded coconut
  • 1 packet of green lemon lime Kool-Aid powder mix
  • 1 bag of your favorite jelly beans
  • 1 quart size zip top bag
Add coconut and 1/2 packet of Kool-Aid powder to zip top bag. Mix the coconut and powder together kneading with hands. 
Mound in the center of the top of the cake to form a nest top off with a large handful of jelly beans.


Sweet TIP: To frost the cake and get beautiful layers add your frosting to a quart size zipper top bag. Snip of one corner of the bag about a half inch up.

Starting with the bottom layer squeeze our large dollops of frosting around the cake top. Spread evenly and repeat as you add each layer. Then squeeze out frosting in a zigzag pattern around the side of the cake. Spread over the sides filling in between the zigzag. Don't worry if you zigzag is straight.

The point of this is to get a fairly even amount of frosting around the cake so it is easier to spread and prevent little cake crumbs from mixing into your frosting.

If you have any holes in your frosting just go back and add another dollop of frosting.
This frosting sets up nicely and is very forgiving. Since it is a coconut frosting it doesn't have to be perfectly smooth.

The kids are going to LOVE this cake.

Happy Easter!

xo


P.S. Here is my Periscope video showing me making the green coconut grass.


Halloween Treats * Taste Pin


We are seeing some cute and clever Halloween food ideas on Pinterest. We just had to share some of them with you. From super easy to a bit more detailed see what we found for you. Happy Halloween!


Recipe:
Halloween Candy Cake
Recipe & Photo by:
Cookies and Cups


Recipe:
Zombie Brains Cupcakes
Recipe & Photo by:
Annie Eats


Recipe:
Mini Doughnut Spiders
Recipe & Photo by:
It's Always Autumn


Recipe:
White Halloween Candy Bark
Recipe & Photo by:
BHG- Glorious Treats


Recipe:
Candy Corn Marshmallows 
Recipe & Photo by:
Knead to Cook


Recipe:
Halloween S'mores Kit
Recipe & Photo by:
Yellow Bliss Road


Recipe:
Mini Doughnut Ghosts
Recipe & Photo by:
Pizzazzerie


For more Sweet and Simple Favorite Pins join us on Pinterest!


Turtle Caramel Apple Nacho Recipe * Food & Drink


We wanted to serve Caramel Apples this weekend for a get together but wanted something that was easier to eat and something everyone could eat in bite size pieces. We decided to take our caramel recipe we make every year and came up with our Turtle Caramel Apples nacho style. It's such a delicious and easy treat to have at a party or just to eat while watching your favorite fall movie.


Turtle Caramel Apple Nachos

  • 8-10 favorite apples - we used red and golden delicious because they grow on our trees
  • 12 ounces of milk chocolate
  • 12 ounces of white chocolate
  • 1 pint of soft caramel 
  • 1/2 cup of chopped fresh pecans
  • juice of 1/2 lemon
Core apples. Slice apples. Toss in lemon juice. Arrange apples on serving dish. Set aside. Chop pecans. Make one batch of caramel. Melt milk chocolate in glass bowl in microwave for 30 seconds stir. Continue every 30 seconds until completely melted. Melt white chocolate the same as milk chocolate.  Drizzle hot caramel over apples. Drizzle melted milk chocolate over apples. Drizzle white chocolate over apples. Top off by sprinkling pecans over the top. Serve. 
Happy Fall!

for Caramel Recipe click here


Tools we used for this recipe:

Glass Mixing Bowls at William Sonoma

Kuhn Rikon Crinkle Cutter at Sur la Table 


Cuisipro Apple Corer at William Sonoma


Regency Vintage inspired Serving Platter at Provision by Food52


sweet and simple participates in affiliate programs

All Time Favorite Finds * by April * Sarah Jane Studios


If you don't already know about Sarah from Sarah Jane Studios you will want to know about her lovely illustrations. She is one of, if not the most talented children's illustrators of all time. I say this with a background in design, art and photography. I say this as a lover of children's books and illustrations. She has the heart and soul of a true creative genius. There is a magic in her images of sweet little children and animals that will capture your heart. It is what you see in a master touch. It is what a true artist is striving for to stir the emotions of the soul.
I first came to know of Sarah in the beginning of her professional journey. It was also way back at the beginning of my professional editor, writing and blogging journey. The first post I could find where I featured Sarah Jane Studios was in Jan 2008. We gave away one of the sweet print sets on my Fun Free Fridays Giveaway back on my original blog Sweet Life in The Valley.

$50 is a steal wouldn't you say for such beautiful art prints! I knew the first time I saw her work that it was special. I had to collect it ALL. I started with the month by month prints and loved that she dated and signed each one. I knew that someday these would be worth a lot and I would pass them down to my daughter and so on. I have the blue read with me print over my children bookshelf. I have a large collection that I started back when I worked as the community relations manager at Barnes and Noble.


It's exciting to see her progress and accomplishments from her art prints to her greeting cards and then to fabric designs, embroidery patterns and paper doll collections which you can purchase in her shop.


You would have recognized her Nutcracker set from the Ralph Lauren Children Store window displays during Christmas this past year in New York City and London.


Not only has Sarah accomplish all this she has also illustrated books including A Christmas Goodnight and French Kids Eat Everything.

Now she has come out with a line of lovely wallpaper and wall art pieces. I can only imagine a childhood filled with her beautiful art and sitting under her family tree wall piece reading a book or staring at her wallpaper at night as I fall asleep.


Sarah Jane is one of my All Time Favorite Finds. I am sure you will love her too.
xo
April


by April Atwater founder and editor-in-chief Sweet and Simple Magazine

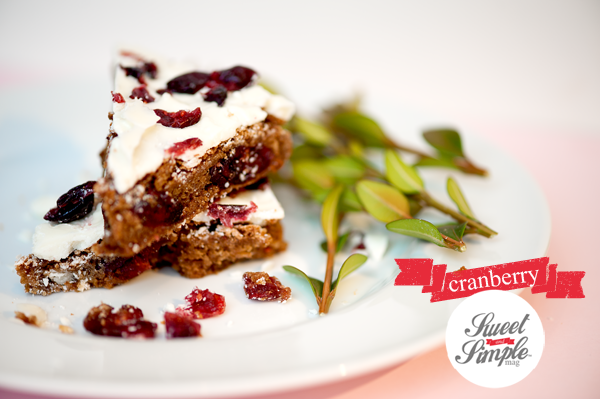
Cranberry White Chocolate Bar Recipe * Starbucks Copy * Taste Pin


I love the Cranberry Bliss Bars at Starbucks but they are only available seasonally so I decided to create a version for our Sweet and Simple readers. If you like the Cranberry Bliss Bars at Starbucks you will love this recipe for Cranberry White Chocolate Bars. They are a great treat to bring to a party or to work for an end of the week treat. Enjoy!

Cranberry White Chocolate Bars
makes 12 servings
  • 1 Stick of Butter (1/2 cup)
  • 2 Cups brown sugar
  • 3 Eggs
  • 2 Teaspoons real vanilla extract
  • 1 Teaspoon baking powder
  • 1/2 Teaspoon salt
  • 2 Cups all purpose flour
  • 1 Cup white chocolate chips
  • 1 Cup dried cranberries
Pre-heat oven to 350 degrees
Melt butter in large glass microwave safe bowl. Add brown sugar, vanilla, baking soda, salt and cranberries then stir by hand. Mix in eggs then slowly mix in flour by hand. Do not over mix. Pour into 9x13 greased pan sprinkle white chocolate chips on top. Bake for about 20 minutes until toothpick comes out clean when poked in the center of the bars.

White Chocolate Ganache Frosting
  • 2 Cups of white chocolate chunks
  • 1/3 Cup of heavy whipping cream
  • 1/4 Teaspoon of pure vanilla extract
In a medium glass microwave bowl melt white chocolate checking every 20 seconds stirring white chocolate as you melt. once melted mix in cream and vanilla. Mix until smooth. Frost over warm cranberry bars.
All bars to cool then cut into 12 pieces and serve.


Recipe & styling by April Atwater photo by Season Atwater


Cookies and Cream White Chocolate Candy Bar Recipe * 25 Days of Christmas


Our Cookies and cream white chocolate candy bars are so easy to make. They take very little time to make and are a crowd pleaser. Wrap them up in some cello wrapping paper and tie with a red bow are a sweet Christmas treat gift.

Cookies and Cream White Chocolate Candy Bars Recipe

  • 12 ounces of White Chocolate 
  • 1 Package of Chocolate Sandwich Cookies- we used the Christmas red colored cookies
In a large glass microwavable bowl melt the white chocolate checking and stirring every 20 seconds until melted. Pour the melted white chocolate in a parchment lined 8 x 8-inch baking pan. Using a chefs knife cut the cookies into chunks. Layer the cookie chunks over the melted white chocolate and press into the white chocolate. Allow to cool completely. Cut into 2-inch squares. Store in an airtight container. 

Merry Christmas!


White Chocolate Peppermint Brownie Truffles * 25 Days of Christmas


Brownies and peppermint and white chocolate rolled up into one tasty truffle treat. Perfect for a gift placed in a pretty tissue paper line white box tied up with a bow. Merry Christmas!


Step 1
Brownie Filling:

  • 1 Cup Butter 
  • 2 Cups Granulated Sugar
  • 2 Teaspoons Pure Vanilla Extract
  • 4 Large Eggs
  • 1/2 Teaspoon Baking Powder
  • 1/2 Teaspoon Sea Salt
  • 1 Cup Cocoa Powder
  • 1 Cup Unbleached White Flour
Note: This is also a great brownie recipe.

In a large glass microwave safe bowl melt butter checking every 20 seconds. Mixing by hand stir in sugar. Then add vanilla, eggs, baking powder and salt and stir just until blended. Add coco and flour mixing just until all ingredients are incorporated. Do not over mix. 
Pour into a buttered 9 x 14 pan at 350 degrees for 30-35 minutes. Do not over bake. Allow to cool.
Using an ice cream scooper scoop out balls of brownie. Form into 1 1/2 to 2 inch balls. 

Step 2
White Chocolate:
  • 12 ounces of  Real White Chocolate 
  • Optional- 3 Drops of Pure Essential Peppermint Oil (we use doTerra brand since it's purest)
Note: Real white chocolate has cocoa butter in the ingredients list. Brands such as Bakers.

With a sharp chefs knife chop white chocolate into small chunks. In a medium microwave safe glass bowl melt the white chocolate chunks. Check and stir the chocolate every 20 seconds until fully melted. Optional- stir in pure peppermint oil. 
Dip brownie balls into the white chocolate using a fork. Tap the excess white chocolate off the brownie balls by tapping mid-handle of the fork on the side of the bowl. Place on a piece of wax or parchment paper. 


Step 3
Candy Cane Topping:
  • 12 Package of Peppermint Candy Canes
In a large gallon sized zipper bag place 6 peppermint candy canes. Hit the candy canes while in the bag with a hammer to crush the candy canes. 
Sprinkle crush candy cane over the top of each white chocolate dipped brownie ball. 
Allow white chocolate to completely set and store in a airtight container. 


Peanut Butter Cup Candy Bar Recipe * Taste Pin * 25 Days of Christmas


Chocolate and peanut butter cups say it all. An easy perfect treat to share with friends and family Happy Holidays! 


Peanut Butter Cup Candy Bars

Servings: 16- 2 inch squares

Ingredients:

  • 1 pound of milk chocolate (tempered)
  • 1 pound peanut butter cups

Method:
Using a sharp knife chop milk chocolate into small pieces. Chop peanut butter cups into large chunks. In a glass microwavable bowl melt the milk chocolate on medium heat checking every 20 seconds until completely melted. Pour into a wax paper lined 8x8 inch baking pan. Sprinkle peanut butter chunks over milk chocolate. Press the peanut butter chunks into the warm milk chocolate. Allow to cool complete and set-up (be sure you chocolate is tempered or it won't set-up properly.) Cut into squares and serve. Store in an airtight container. 

Sweet Tip:
Tempering chocolate this simple way. Melt your chocolate and allow to cool completely then melt again to use. 


Food & Drink * Easy Microwave Caramel Recipe


Fall food means caramel recipes. Our simple caramel recipe is made in the microwave. It's very easy to make. No candy thermometer is needed. The caramel can be used to dip apples, pears or other autumn fruits. It can also be rolled into soft caramels. Add nuts for the nut lover.

Easy Microwave Caramels

  • 1 cup butter 
  • 2 1/2 cup dark brown sugar 
  • 1 can sweetened condensed milk 
  • 1 cup light corn syrup 
  • dash of salt 
  • 1 tsp vanilla 
Mix all ingredients in a microwavable bowl. Microwave 2 minutes and stir. Continue to microwave for 12-15 minutes stirring every 2 minutes. Caution, the caramel will be very hot! Have a bowl for ice water on hand in case of burn. Add vanilla & nuts (if desired) to fully cooked caramel. Vanilla will make the caramel mixture boil up. For caramel apples dip apples straight in caramel rotating to cover the entire apple or pear. Then dip bottoms of caramel apples in chopped nuts, crushed cinnamon graham crackers or what ever suits your fancy! For caramel candies pour hot caramel in butter 9X13 pan and cool completely. Cut in to pieces and wrap in wax paper squares.

Sweet & Simple Tips:
- Chill your apples to help prevent caramel from running off your apples
- Use hot pads when you handle the bowl it will be hot!
- Cut squares of vellum paper or wax paper squares to place under your finished Caramel Apples
- Cut wax paper squares to wrap your caramels
- Sprinkle some Fluer De Sel Salt on Caramel Pears/Apples for added flavor


post & photo by April A. founder & editor-in-chief


Easter Basket Ideas * Home & Entertaining


Easter is coming very very soon. We looked around to share with you some of our favorite for filling a sweet Easter Basket for you or your kids.

1. Every Easter Basket needs a chocolate Easter Bunny. Lake Champlain Chocolates makes this cute yummy Organic Milk Chocolate Hopp'n Bunny we love.

2. Looking for the perfect stuffed animal for your Easter Basket? Why not go to the best? German brand Stieff is one of our very favorite as well as one of the very best when it comes to stuffed animals. William Sonoma has a sweet little stuffed Stieff Bunny and Lamb that is sure to become an heirloom.

3.We all know that candy made with real flavors just tastes better. Surf Sweets makes a very tasty Organic Jelly Beans that are all natural.

4. A large cream filled chocolate Easter egg with our nicely written across the top is a tradition for years. See s Candies makes a delicious assortment of cream eggs including the Chocolate Butter Egg shown above.

5. Peterborough baskets are good quality baskets, the kind you will want to keep after Easter to use to store some toys. The Peterborough Easter Baskets come in pink, blue and natural colors as well.


White Chocolate Coconut Easter Nests * Food & Drink


White Chocolate Coconut Easter Birds Nest with jelly bean eggs are a tradition at our house. My mom would make them when I was growing up and I started making them for my kids when their were toddlers. It is a simple recipe. All of the kids will love to help you make them.


White Chocolate Coconut Easter Nests

  • 2 cups of shredded sweetened coconut
  • 2 cups of white chocolate chips
  • 1 bag of your favorite jelly beans
  • Green food coloring

In a large microwave bowl melt the white chocolate chips in microwave checking every 20 seconds. Once melted stir a few drops of green food coloring and shredded coconut into the white chocolate. Spray a muffin tin with non-stick vegetable spray. Press scoops of white chocolate mixture into the muffin tin shaping into nests. Right away before chocolate cools press jelly beans into the white chocolate nest for the birds eggs. To remove nest from the muffin tin place the bottom of the pan in warm water and lift out. Enjoy!


by April A. founder & editor-in-chief